Monday 25 November 2013

3D Technical Development - Sofia's Hair and Skirt

I further developed on the Technical Dynamics of Sofia's Character.

For the hair I looked at several references;


It was important to think about how these motions and movements could easily translate to the style of my film and characters. Since the characters will be toon shaded, or shaded with stylised subsurface the hair will most likely not be actual Maya Hair but instead be modelled Polygons.


Initial Test (Not too great)


Developed (Much better, but still needs tweaking and adjusting)


Saturday 23 November 2013

3D Development - Sofia's Dress Dynamics


After Laura developed the Eleven Rig and customised it to match the character design and style of Sofia, it's been handed to me to create all the extras such as her dress, boots, hair etc. 


Here I have created a test for Sofia's Skirt. As you can see the dynamics work pretty well! I have had to set up my nCloth, nRigid's and Constraints to achieve this. I will now create the actual skirt (which will be pleated) and continue with her character.

Friday 22 November 2013

3D Research, Development and Production - Shave and a Haircut

So now that I have gotten to grips with Shave and a Haircut in Maya I decided what better way to develop my skills with it than to create a roll of haystack for my scene! After a couple more tutorials from Digital Tutors I took to Maya.

Below I show my development process: (The initial process of applying and combing/styled I have skipped over)


Once I applied the Shave system to my geometry (a cylinder), I combed and styled the hair in the motion of a haystack.


Then I adjusted the colour/tone and tweaked a bit more.


Then took care of the "bald spots" and gave it more of a haystack look, until I was finally happy with what I achieved.


However there are still a few rendering errors that me and Mikey will need to sort out, also as you can see I am not trying to go TOO realistic with this shave and haircut system, as the scene and overall film is heavily stylised, it is important to work towards that style rather than create something ultra realistic but work away from it.

Thursday 21 November 2013

Sound

For this film, a good friend of mine, Devesh Sodha, will be creating the sound and music.

Devesh is a Music Composer who lives in Leicester and has recently been employed by a Hollywood company, so I am quite honoured by the fact that he will be finding time throughout the year to compose the music.

After speaking briefly with Devesh, we both had ideas for the music of the film. In the end however, we both agreed that something along the lines of Dreamworks' Animations music would be a great fit, Devesh will be exploring this avenue and inputting his own charming notes into the music.


Saturday 16 November 2013

Ready for Production (PRODUCTION PLAN)

PRODUCTION PLAN


Above is a link to my Production Plan, I have set this such that there is MAXIMUM time available for the Animation Process. Not having to rig and model characters is a big time saving benefit which I intend to take full advantage of.

Friday 15 November 2013

Pre- Production Review


Live Action Reference for Animation


So here are some videos I shot with Mikey for Animation reference, as well as for (some of them) light and shadow reference for Mikey. Pretty daft overall as I'm prancing all over the place, but a lot of fun! Plus it always helps to have some sort of reference to refer back too when animating.


3D Research - Using Props

In the film, I realise that it's pivotal that my characters interact with their props correctly. It's absolutely essential that when me and Laura go to animate in Maya we know how to use Props in Character Animation! So I took some time to learn how using the help of a book I have purchased which will aid me in all my character animation endeavours. The book provided tutorials which I was able to follow.


My prop is a pencil and my rig is ready and posed. So the character is going to be using this pencil in it's hand. First I create a locator and place the locator approximately where the character will be holding it. Then I centre the pivot of the pencil to the centre of the locator. I then parent the pencil to the locator. 


And once I position the pencil where I need it to be (I can just use the locator to move the pencil around now!) I select the hand control of the rig and then the locator and use a Parent Constrain.


I then looked at this one step further, to find out how to pass a prop between two characters


So here there is a character passing a pencil to another, I will be adjusting the Parent Constrain applied to the pencil so it will be able to pass between the 2.


First parent constrain the second character hand to the pencil.


I now have weights on both constrain, I don't need this, I only need the weight to be on the first characters hand up till frame 32, THEN it needs to pass to the other character. 


So I gave the blue character a weight of 0 on it's Parent Constrain up till frame 32. and the other constrain a weight of 1, i then Key the weights


And then I swap the weights around on Frame 33, so the pencil can then be passed!


3D Research - Shave and Haircut

I like to try and explore new avenues during my projects and creating a film in an exterior farm environment gives me the perfect opportunity to explore one of the things I've had an itch to do; creating some beautiful grass.

Shave and Haircut is a plugin for Maya which allows the user to easily create, comb and style hair and fur. I have been experimenting with this plugin and created some pretty cool stuff. I'll be working with Mikey, my render artist to see if we can implement this well into my layout!

I spent a good afternoon learning about Shave and Haircut, it was well worth the effort!


Playing around with the combing features


Shave and Haircuts Shelf


Shave and Haircut Menu


Shave and Haircut settings

Let's compare previous grass tests to the grass tests now!

PREVIOUS


CURRENT GRASS TESTS!


I'm no lighting artist and yet these are looking good already! The Shave and Haircut tests are far softer and has a more "cartoonish" look to it.


3D Research - Making Modelling easier with Maya Bonus Tools


To make modelling the scene easier for Zoe, me and my tutor looked into a method in Maya.

Problem: The problem, is that seeing as the layout for the film is an exterior set in a farm/country environment there will be plenty of grass clumps, pebbles etc. Now it will take Zoe an extraneous amount of time to physically place every single element of the scene herself. So why not look for an easier method?

Solution: The solution is simple. Maya offer a 3D extension known as Maya Bonus Tools which I can install straight onto my machine. There is a function within this package which allows me to select a piece of geometry and then "Paint" Duplicates straight onto a mesh. So i'm going to go through step by step how the process works.


So I want to duplicate paint this cube onto this plane a couple of times.


In my Bonus Tools Menu I go to Modify and select Geometry Paint.


A window will pop up, and in this window I input the name of the geometry I want to paint in the "Geometry" section(in my case pCube1) and leave the identifier as Geom. There are many other settings available if I want to get more nitty gritty with my duplication.


And voila! I can now paint a multitude of cubes straight onto the plane just like that! Brilliant!


More Layout Developments!

With some time left on my hands, and my hands itching to explore painting on Photoshop a bit more I decided to cook up another painting for the team, this sort of stuff just gives everyone, especially Mikey my lighter and renderer, a great idea of shots, scenery and cinematography.


Early morning Barn.

I made sure to really capture the oranges and purples the sky would have at this time of the morning, this really tops it all off.


Concept Design - The Kites

Laura initially produced Concept Art for the film which featured Bagboy with the Kites. Now, unknowingly, Laura had set the Kite shape from that very point as no matter how many times I sketched out various shapes for the base kite, I just kept coming back to the diamond. Because it's edgey, it represents something about Bagboy. Represents the edgey, confident quality to him that he's not afraid at the end of the day to go up to the girl despite all his fears, and offer her the kite.


It took me a while to figure out though, what shape/style the final kite that Bagboy presents to Sofia should be. In the end, while it's all a bit cliché, we went for this heart shape, as the shape extends out to not just the fact that Bagboy is giving his heart to Sofia metaphorically speaking, but how the Kite is brutally destroyed THEN ALSO run over by the car...well the imagery speaks for itself really!


So here is the Sheet featuring all 3 Kites, and the different variations of Kite deterioration I will need.


And here is a sheet for Zoe, which details with pin point accuracy, exactly how I need my kites put together, she can also take this concept and apply it to the heart shaped kite as it is essentially the same sort of thing.

Finished Animatic With Sound


Here is the finished Animatic with Sound. Please note the sound in the animatic is for MOOD only! It does not reflect the FINISHED sound to be in the final version of the film!!

Having said that I am EXTREMELY please with what my composer and sound designer, Devesh Sodha has created for me.

You will also note that there are some changes, yesterday I had the chance to sit with Hillary and trim even more off from the film, It's now at a wonderfully paced 3 minutes 20 seconds of Animation, if that, considering there are many subtle shots with little movement.

Wednesday 13 November 2013

Finished Character Development and Design - Bagboy


Using Arcs to create solid pose.


Turnaround Sketch


More defined poses


Head Sketches, Pushing the PaperBag to it's limits.


A clothing selection for Bagboy, I just wanted to test out how some other styles of clothes might look before committing to the white vest and blue shorts look.


Bagboy Turnaround Lineart


Monday 11 November 2013

3D Research and Development - Kite Rig

I knew that one of the most important things in this film would be the Kites. And of course these Kites would need some sort of fluid movement, so I considered an array of options.

The first option I considered was to use 2D Animation for the Kites. However me and the team instantly shot this down as it would require someone on the team confident enough to crank out a large number of these 2D animated kites very quickly as well as make any changes if necessary. Now whilst I am more than able to create 2D Animation myself, my team will be taken up by the 3D Animation side of things once we're well into production, plus a solid compositor would be needed to ensure the Kites don't look out of place once they are animated into the scene.

The second option for the Kites was one that was far more plausible; creating a Rig for the Kites.

Having rigging knowledge meant I was able to come up with a 3D solution fairly quickly with plenty of variables open to consideration once I had rigged the Kite.

In my 2nd year I rigged a ball and a chain using a clever rigging process where a Maya nHair could be used to drive a joint chain. See the video below (0:52 seconds)


This rig worked quite well for this sort of thing and I believe that it would also work for a Kite system.

So before I open up Maya I had a look at a few videos on Youtube looking at Kite movement for reference and assessing how I would go about doing this technically.


From these videos I realised two things;

1) When a Kite is being flown in a stationary position, quite still, it simply soars and floats through the air quite gracefully.

2) However, when the Kite string has some sort of Kinetic force applied to it (eg. pulling), then the Kite begins to flail about drastically because of the disturbance in it's movement.

Without further ado, I opened up Maya.


Created simple model of Kite and it's string.


Create a Nurbs plane, and assign it a singular nHair Curve.


Nurbs plane with nHair Curve


Interactive playback mode, you can see how the nHair dynamically moves, because it's using a low level of dynamics it is very fast at rendering at real time.


Create joints for my Kite.


So that it goes from the bottom to the top.


Use the IK Spline Handle Tool by selecting my first joint, last joint and nHair Curve to have the joint chain be driven by my nHair and then simple Bind my Rig to the Kite Model. In interactive playback I am able to move the base nurbs plane (created in the first step) around and the Kite will dynamically move.


And the best part is, is that since I am using a Hair System for this rig, it allows me to instantly adjust my dynamic settings just like I would on any other hair system (for example, I can add less or more gravity, wind etc.) which is perfect for something like a Kite!

Test Video below:

Kite Test 01:


Kite Test 02 with wind less gravity


Kite Test 03 Little Movement


Sunday 10 November 2013

A Big Change!

This week the team took a bit of a hit with the news that Amelia, one of my 3D Modellers, would no longer be working with us on the film. She says that she underestimated the size of her own project and is unable to carry on providing me with any more work.

Now this was pretty sad news for me to be honest, and quite the blow as it meant that the duties of Modelling Sofia (character model) would fall upon me as all the other modellers in the class were more than busy with their workload. This put me under pressure as it meant I would have had to add that to my schedule which was already pretty packed with things to do.

Having analysed and mulled over the situation for a day I talked to one of my mentors, Sultan, and we both agreed that the best course of action would be to use a Pre-Made Rig for the character of Sofia. Since I'm already using a pre-made rig for Bagboy's character, we agreed that simply using another one for Sofia wouldn't take away from the film.

So now me and Laura are going to take what we can from her Pre-Production development of Sofia and apply it to a pre-made rig.

Rough Animatic

In the space of a week or so I created a Rough version of my Animatic.

Rough because I decided that more than likely I would be encountering many changes once the Rough version was locked down.


With this rough version the main thing I wanted to do was make sure things had a sense of flow to them. Let's talk about the process and the problems;

When I finished roughing out the last shot I realised I had a MAJOR problem; time. The Animatic with all 3 Act's was running up to approximately 6 minutes or so, which was FAR too long. Also some sections were not jelling quite as well, and some just felt like they were extraneous to my film.

Drastic action had to be taken, so the first thing I started to do was make large cuts in places. As you can see from the Rough Version above, the entire first third of Act 2 is gone (the section where Bagboy attempts to grab Sofia's attention), this section of the film was always a bit unbalanced in my mind, and unnecessary, and while I AM glad that I was able to board it out and then time it in the Animatic, it just HAD to go as it was really putting a back-burner on this film.

Next I went and made smaller cuts, and cut out several shots or simply make shots link more easily and fluid while also saving time. Little by little I was successfully able to cut my film down to the length that it is now (5 minutes), and whilst that is still too long; it's going to be easier from here on out to trim it down.

When showing Neil and Hillary my animatic, and while also repeatedly viewing it myself I noticed a number of things I needed to improve on;


  • Too many shots wind up going on longer than they should. This is one of those habits I KNOW I have a tendency to repeatedly do, but luckily I was able to notice it myself this time round.
  • Some cutting points are slightly messy.
  • After Bagboy runs off towards the ranch in the opening shot, have the camera pan up higher into the sky and then show the title of the film..."On The Fence".
  • Show a shot of Sofia daydreaming and looking at shapes in her clouds to further emphasise her world being turned upside down by this 'Bagboy' and his interrupting Kite!
  • Sofia ought to be grumpy when she first sees Bagboy, to further embellish her character, which leads on to her motive and quite possibly the most drastic change/addition...
  • SOFIA NEEDS TO BE SHOWN GOING TO PULL THE KITE DOWN AFTER BAGBOY LEAVES HER THE FIRST TIME. This is an extremely important decision at it is the cherry on top and final bit of exposition as to why she would want to bring the Kite down in the first place!
  • The Kite needs to be established that it is actually flying in the scene where Bagboy goes back to his stump the first time.
  • Show a reaction shot of Bagboy being happy that his Kite is in the air the first time just before it is cut.
  • The montage sequence - when Bagboy is sat at his stump, make the action of him actually sitting down the cutting point for the shot (eg; Shot starts - Bagboy sits - THEN reacts to Kite falling)
  • Sofia needs to be doing something else other than tending to a horse in the last act (purely for technical reasons) Perhaps now that the start of Act 2 is out I can show her working with the haystacks here instead.
  • When Bagboy is putting the moves on Sofia in Act 3; show the red kite drifting to the floor slowly.
  • After Bagboy presents the Spindle with the broken string in the last act, have an OTS shot to Sofia showing her reacting and then pointing past him to the road where the broken kite lies.
  • Reduce the number of shots when Sofia approaches Bagboy near the end with the fixed Spindle.

With all this in mind it's time for me to move forward again and start creating my clean animatic, with locked down timing and all the changes from above.

Storyboards - 100% Complete


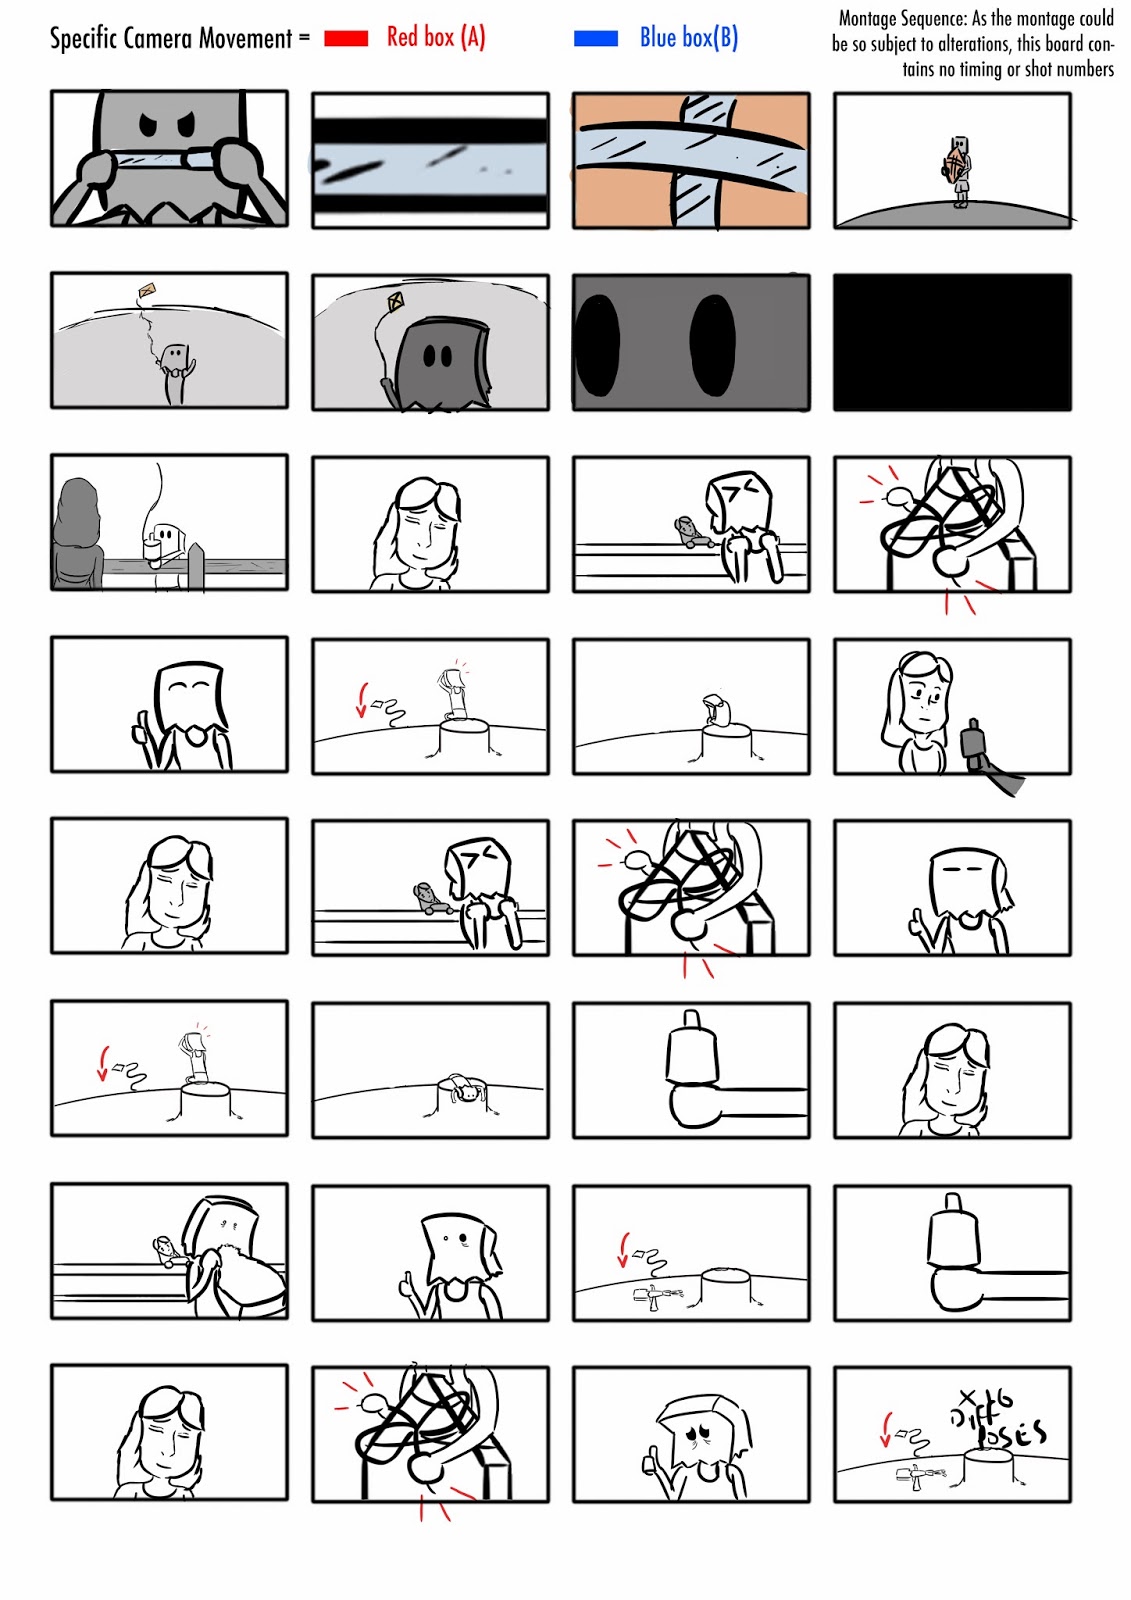
We start off on a cold cut, black screen. The sound of sellotape being pulled is heard and we cut to a young boy taping a kite down, and then putting a Paperbag on his head. We see him run off towards a ranch as the camera pans down to his kites. Fade out.

The ranch opens with a slow moving Windpump, and a young girl is daydreaming under a tree, a kite quickly invades her daydreams, and she looks around for where it came from. Finding it's source, she walks towards the young, shy boy hiding behind the fence. When he musters up his courage, he offers the girl the kite, who simply refuses. Disappointed, the boy quickly has an idea and breaks the kite from it's spindle, ties it around a picket and walks off merrily, while the young girl looks on. The boy arrives back to his stump and sighs.


At the stump, the boy is looking at his kite, just looking, when suddenly....it comes down! Shocked, the boy runs to the peak of the hill to assess the situation, but unable to find neither the girl or the kite he simply lies on to the ground and rolls back down over the hill. Fade Out

The next shot opens with a pair of hands lifting a haystack. The girl is working the ranch, and by the fence, is the young boy once again, waving to her. She simply smiles and carries on working. The boy decides to try again, and frantically waves at her, she however is totally unaware of his actions and the boy is soon disheartened. He has another idea and with a click of his fingers the next shot cuts to him tying his kite string around the fence, just as before. The moment he looks up however, the young girl is stood over him, scowling. With a dash of smoke he disappears and we see him again back at his spot on the hill. With keen eyes he observes his kites movement...and just as the tension comes to a build....snap. The kite comes down, and the boy, losing his confidence completely, puts his head to his hands. Yet before long, he plucks up the courage, pulls his trusty piece of adhesive tape out....


And tries again! The screen is taped across, and as the camera pulls back we see the boy's next kite offering, as he is stood atop a hill. He runs down the hill and into the camera, the screen transitions to black through his eye.

Montage sequence; The boy consistently offers the girl kites in quick cut and repetition style. She however simply rejects him each and every time.


The montage comes to a complete halt with a shot of the boy sat atop his stump, centrally framed, with his hands to his chin. Looking utterly tired and exhausted of this rejection. With one last look to his craft materials, he gets up, walks over to them and as the screen cuts to black. A LONG sound of adhesive tape being pulled is heard, before we cut to a shot of the boy with an incredible kite unlike he has made before. He throws it into the air, and as the camera follows and pulls back to a 3/4 shot of his face, we know he's ready, and he knows too...as he begins to walk towards the ranch!

The young girl is tending to a horse, until she realises someone is there...she looks round and is in complete awe! The boy is stood across the road, tie and all, with the incredible kite flying high in the sky. Cars are used to screen wipe closer and closer towards him, and as we come to an extreme close up, we see the immense determination in this young boys face.

Trouble is looming however. The incredible kite he has made is beginning to tear under it's weight, and the tape is peeling off...
The young boy is putting on all his moves to the young girl, however when he gets to offering the Spindle his face turns to shock. For behind him, on the road, lay his precious red kite. Torn and broken. Silence follows...only to be broken by the sound of a car whizzing by and adding insult to injury as it tears into his kite even more!

The young boy knows when to take a sign when he sees one, and simply gives up, chucking his spindle. With one final look to the girl, he walks off.


The girl, sad, and slightly guilty, looks down towards the spindle. And the camera pulls back with a depth pull...she has an idea.

It is now sunset and the young boy is back at his usual spot, looking onto the ranch. He gets up, expressionless, and begins to walk away...

Then, he notices a shadow of one kite...then another! He turns around quickly and before him, is a plethora of beautiful kites, soaring high in the sky...including his precious red kite! As the camera looks onto our hero with a long shot, the girl comes into frame, holding the broken (but now fixed) spindle. As the boy looks around, he sees his love standing there in the sunlight. She approaches him and he to her, and for a moment they say nothing. The girl then offers him the spindle just as he did the very first time, and dumbstruck, he looks at her before jumping towards her for a great big embrace!

As the camera pulls back on them to a long wide shot, the embrace lasts for a few seconds. When the camera closes in again, the 2 are slightly shy at first, until the girl holds out her hand. The boy stares at her for a few seconds, before taking it into his own and the two walk off into the sunset, and the camera pans down.

The last thing we see is the Paper bag now on the floor, he'd succeeded.